Intro
Let’s write about 0 downtime database movements, let’s say we want to streamline a process to move a database (mysql) from an ec2 instance to a kubernetes cluster in another AWS account. Without a single second of downtime.
I will use GTIDs just for the fun sake of it. Let’s always RTFM
Global Transaction IDs are a way to ensure consistency when mirroring a database. For every transaction in the origin (master) database, a global identifier is written in the binary log of that database. Binary logs (or the binlog table) store the actual transaction data. They are not mutually exclusive with the binlogs, they are complementary.
In other words: Binlog can exist without GTID mode. GTID mode cannot exist without Binlog.
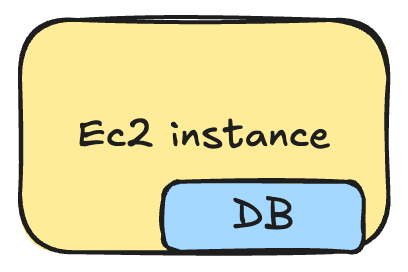
Let’s say we have this initial state:
TLDR
In short, our steps should be as follows:
- Configure origin mysql server to allow GTID replication (consistency is a MUST).
- Set up a peering connection between the AWS accounts.
- Perform a hot-backup with percona xtrabackup for an initial dump.
- Stream upload the backup to an s3 bucket.
- Upload credentials in hashicorp vault.
- Deploy a helm chart
- Instruct the replica to use the origin as the replication data source and to use auto-positioning.
Hands on
Step 1: Prepare origin DB
In this step we will prepare the origin DB, upload the credentials to hashicorp Vault and upload the hot-backup to s3.
 We want to ensure seamless replication, so there is no risk of data loss and the master and the replica are always in sync. This is why we choose to use GTID-based replication.
If GTID is not enabled before taking the dump:
- The transactions in the dump will not have GTID information.
- The replica cannot use GTID-based replication, as GTIDs are not recorded in the source’s binary logs for those transactions.
To check if GTIDs are enabled in our servers we can check with the mysql command SHOW VARIABLES LIKE 'gtid_mode';
We must set both variables enforce_gtid_consistency and gtid_mode to ON.
FYI: the
mysql.gtid_executedsystem table is used to preserve the assigned GTIDs of all the transactions applied on a MySQL server, except those that are stored in a currently active binary log file. This table is used to preserve GTID history even after binary logs are deleted.
mysql>  SHOW VARIABLES LIKE 'log_bin';
+---------------+-------+
| Variable_name | Value |
+---------------+-------+
| log_bin       | ON    |
+---------------+-------+

mysql> SHOW VARIABLES LIKE 'gtid_mode';
+---------------+-------+
| Variable_name | Value |
+---------------+-------+
| gtid_mode     | ON    |
+---------------+-------+

mysql> describe mysql.gtid_executed;
+----------------+----------+------+-----+---------+-------+
| Field          | Type     | Null | Key | Default | Extra |
+----------------+----------+------+-----+---------+-------+
| source_uuid    | char(36) | NO   | PRI | NULL    |       |
| interval_start | bigint   | NO   | PRI | NULL    |       |
| interval_end   | bigint   | NO   |     | NULL    |       |
+----------------+----------+------+-----+---------+-------+

-- let's create a replication user for replication purposes:
CREATE USER IF NOT EXISTS 'replication'@'%' IDENTIFIED WITH mysql_native_password BY 'testpassw0rd!';
GRANT REPLICATION SLAVE, REPLICATION_SLAVE_ADMIN, REPLICATION CLIENT ON *.* TO 'replication'@'%';
-- we don't need to flush privileges since we used the `GRANT` keyword ;)
Step 2: Set VPC peering connection
Setting a VPC peering connection is quite straightforward, the goal is to connect two isolated networks, so we need to write down the CIDRs of each network, and then modify the route tables to allow traffic between them.
We have ACCOUNT_A vpc with:
10.20.x.x/16 network
We have ACCOUNT_B vpc with:
10.10.x.x/16 network
If we want traffic to flow between the networks, we will need to set the following route table rules:
| Route table | Destination | Target |
|---|---|---|
| VPC A | VPC A (10.20.x.x/16) | Local |
VPC B 10.10.x.x/16 | pcx-11112222 | |
| VPC B | VPC B 10.10.x.x/16 | Local |
VPC A 10.20.x.x/16 | pcx-11112222 |
VPC peering has been done, now we can ensure the origin DB and the replica can have a streaming connection.
Step 3: Perform a hot backup with percona xtrabackup
Once the origin server is configured, we can make an initial dump with percona xtrabackup.
The documentation specifies to use xbcloud binary to upload data directly into s3, but as I want a single compressed file I will do it on my own, a single compressed file is easier to handle as it’s only one object, you can access it’s metadata without any additional requests and it simplifies streamlining the process.
docker run --rm --name pxb -it --user root \
    -v /var/lib/mysql:/var/lib/mysql \
    -v /var/run/mysqld/mysqld.sock:/var/run/mysqld/mysqld.sock \
    percona/percona-xtrabackup:8.0 \
    /bin/bash -c \
    "xtrabackup --backup --stream --datadir=/var/lib/mysql/ --user root --compress --compress-zstd-level=1 --socket /var/run/mysqld/mysqld.sock | aws s3 cp - s3://dbmigration/mysql.xbstream.zst"
After this dump, we are going to upload it into a new s3 bucket just in case we would like to streamline this process and automate it. To do so we will upload a policy into the instance profile of our ec2 instance.
Step 4: Cross-account bucket access
After this, we need to ensure this s3 bucket from our account has access from the destination account where our EKS cluster will be. In order to quickly and dirty prepare cross-account access to our s3 bucket for download (readonly) we will need this policy:
{
    "Version": "2012-10-17",
	"Statement": [
		{
			"Sid": "Allow access from ACCOUNT_B",
			"Principal": {
			    "AWS": "arn:aws:iam::<ACCOUNT_B>:root"
			},
			"Effect": "Allow",
			"Action": [
			    "s3:ListBucket",
			    "s3:GetObject",
                "s3:GetObjectVersion"
			],
			"Resource": [
			    "arn:aws:s3:::<BUCKET_A>",
			    "arn:aws:s3:::<BUCKET_A>/*"
			]
		}
	]
}
We can test so with simple commands locally:
❯ aws s3 ls --profile account-b s3://bucket_a
2025-01-10 12:54:42          0 testfile
❯ aws s3 cp --profile account-b s3://bucket_a/testfile .
download: s3://bucket_a/testfile to ./testfile
But we want to access them through kubernetes, therefore IRSA comes into the game, with the following policy:
### Main policy
{
    "Version": "2012-10-17",
    "Statement": [
        {
            "Sid": "Allow RW bucket",
            "Effect": "Allow",
            "Action": "s3:*",
            "Resource": "arn:aws:s3:::temp-sre-db-migration"
        }
    ]
}

### Trust policy:
{
    "Version": "2012-10-17",
    "Statement": [
        {
            "Sid": "",
            "Effect": "Allow",
            "Principal": {
                "Federated": "arn:aws:iam::ACCOUNT_B:oidc-provider/oidc.eks.eu-central-1.amazonaws.com/id/xxx"
            },
            "Action": "sts:AssumeRoleWithWebIdentity",
            "Condition": {
                "StringLike": {
                    "oidc.eks.eu-central-1.amazonaws.com/id/xxx:aud": "sts.amazonaws.com",
                    "oidc.eks.eu-central-1.amazonaws.com/id/xxx:sub": "system:serviceaccount:*:*"
                }
            }
        }
    ]
}
We will name the role irsa_role_db_replication and attach the policies created above.
Now we can add the eks.amazonaws.com/role-arn: "arn:aws:iam::account_B:role/irsa_role_db_replication" annotation into our service account so our kubernetes resources can use AWS services (in this case read from an S3 bucket).
Step 5: Upload credentials in hashicorp vault
To populate the vault, I have created a vault user, and use the API to authenticate and upload the values. With Ansible, this would be a two-step operation:
- name: Log into vault (http)
  shell: |
    curl --request POST --connect-timeout 5 \
    --data '{"password": "{{ vault.password }}"}' \
    https://{{ vault.url }}/v1/auth/userpass/login/{{ vault.user }} | jq -r .auth.client_token
  no_log: true
  register: token

- name: Send payload to vault
  no_log: true
  shell: |
    curl -X POST -H "X-Vault-Token: {{ token.stdout }}" \
    -H "Content-Type: application/json" \
    -d '{"data":
      {"SOURCE_HOST_IP":"{{ local_ipv4 }}",
        "DB_REPLICATION_USER": "{{ db.replication_user }}",
        "DB_REPLICATION_PASSWORD":"{{ db.replication_password }}",
        "DB_USERNAME": "{{ db.username }}",
        "DB_PASSWORD": "{{ db.password }}"
      }}' \
    https://{{ vault.url }}/v1/{{ vault.db_replication_kv_path }}/{{ serial }}
this user is only used with the ansible playbook to populate the vault, it has capabilities only to populate the kv/db_replication/$DATABASE path.
In order to use vault injector for our kubernetes workloads, we will have a role.
The authPath for the role will be determined by our kubernetes access in vault, in my case I have:
auth/kubernetes-test-cluster/role/db_replication
And the policy attached to the role is:
path "kv/data/db_replication/*" {
  capabilities = ["read", "list"]
}
path "secret/metadata/*" {
  capabilities = ["read", "list"]
}
path "auth/kubernetes-test-cluster/role/*" {
  capabilities = ["read", "list","create", "update"]
}
path "auth/kubernetes-test-cluster/db_replication/login" {
  capabilities = ["create", "update"]
}
Our vault setup is ready! We can now begin to deploy our kubernetes resources
Step 6: Set up helm chart
A helm chart will be deployed with the following containers
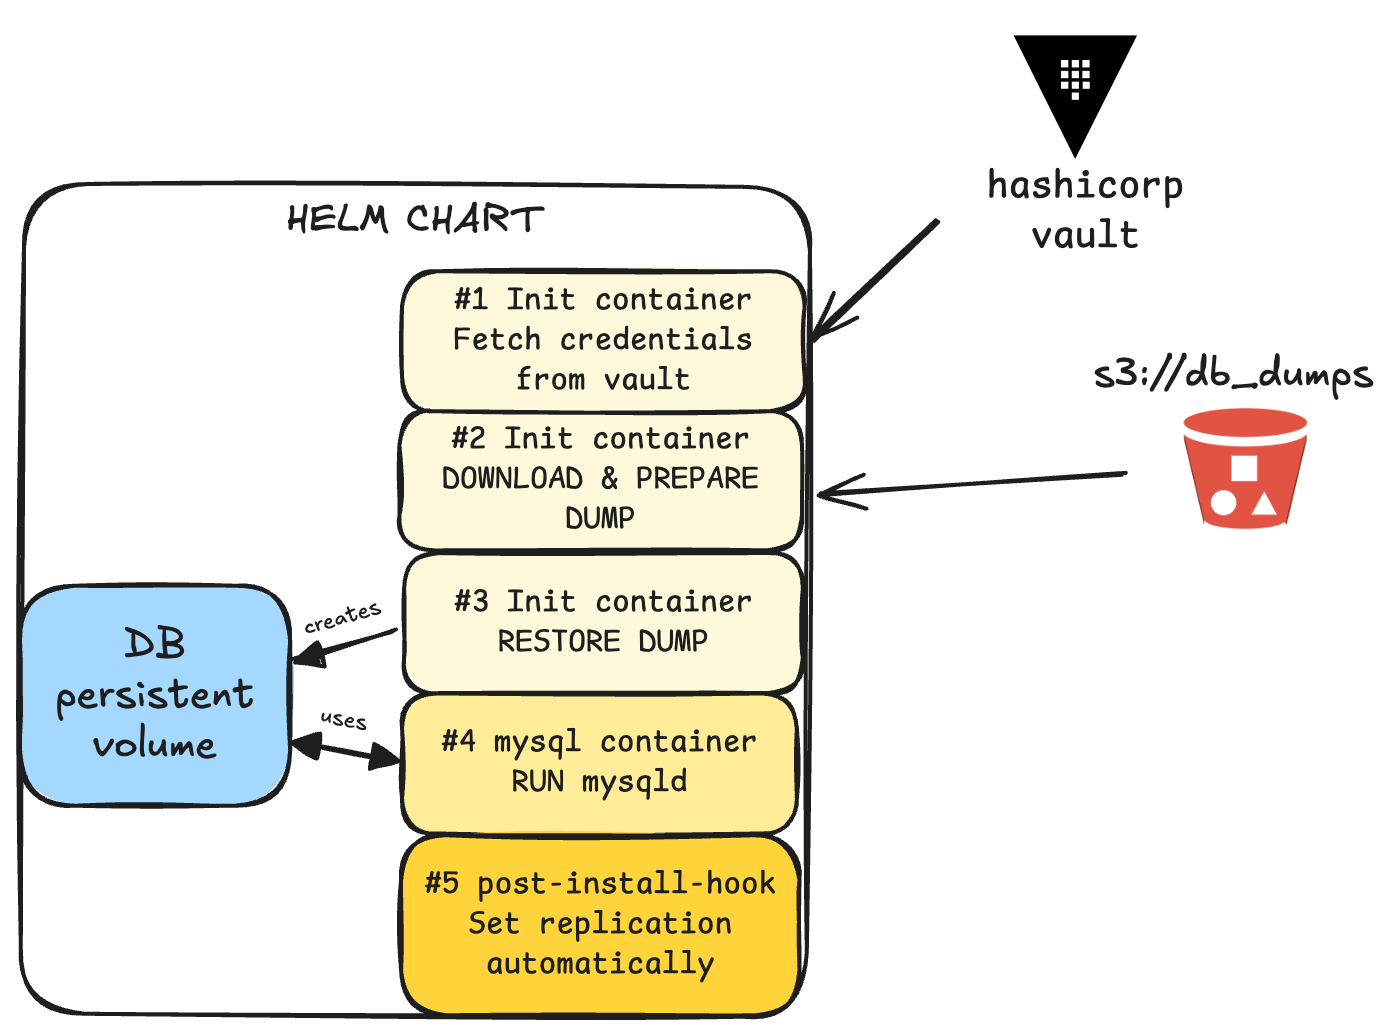
The start up will be in this sequence:
- Fetch DB credentials from vault
- Download and prepare percona xtrabackup
- Restore xtrabackup into a new Persistent Volume
- Run mysql
- Set replication automatically
Well… I lied to you a little, in reality, the post-install hook is always executed after the helm installation (this is by design), so I crafted the hook to have a retry loop that will wait until the database is up & running before setting the replication automatically.
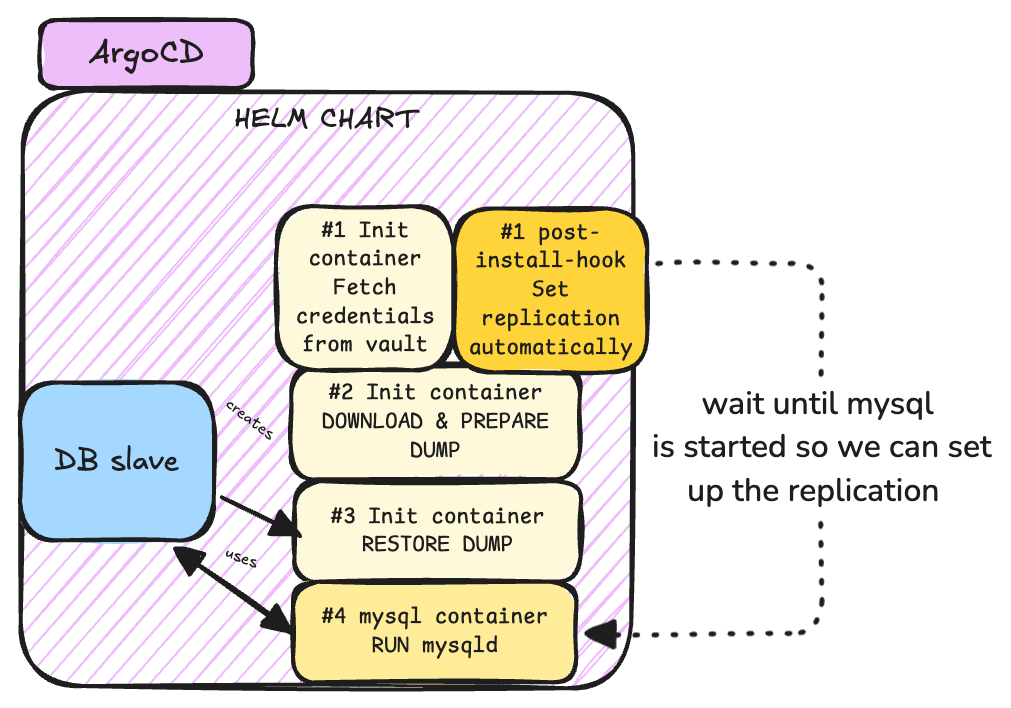
The script is basically something like this
MAX_RETRIES=10
RETRY_DELAY=60
RETRY_COUNT=0

check_mysql_connection() {
  timeout 5 bash -c "echo > /dev/tcp/$MYSQL_SERVICE_HOST/3306" && echo "Connected" || return 1
}

while [ $RETRY_COUNT -lt $MAX_RETRIES ]; do
  if check_mysql_connection; then
    # Connection successful, proceed with replication change
    source /vault/secrets/database-config.txt
    mysql -u "$DB_REPLICATION_USER" -h "$MYSQL_SERVICE_HOST" -p"$DB_REPLICATION_PASSWORD" -e "
      CHANGE REPLICATION SOURCE TO
      SOURCE_HOST='$SOURCE_HOST_IP',
      SOURCE_PORT=3306,
      SOURCE_USER='$DB_REPLICATION_USER',
      SOURCE_PASSWORD='$DB_REPLICATION_PASSWORD',
      SOURCE_AUTO_POSITION=1;
      START REPLICA;
    "
    # Ensure replication is properly set
    REPLICA_STATUS=$(mysql -u "$DB_REPLICATION_USER" -h "$MYSQL_SERVICE_HOST" -p"$DB_REPLICATION_PASSWORD" -e "SHOW REPLICA STATUS\G" | grep "Replica_IO_Running: Yes")
    if [[ -n "$REPLICA_STATUS" ]]; then
        echo "Replication ONLINE" && exit 0
    else
        echo "Replication FAILING" && exit 1
    fi
  else
    # Connection failed, retry after delay
    RETRY_COUNT=$((RETRY_COUNT + 1))
    echo "Retry $RETRY_COUNT of $MAX_RETRIES: MySQL not ready. Waiting $RETRY_DELAY seconds before retrying..."
    sleep $RETRY_DELAY
  fi
done
# all retries failed
echo "MySQL connection failed after $MAX_RETRIES retries."
exit 1
As the container does not have curl, wget, netcat or any other network tool, I will use the /dev/tcp special linux device to ping the 3306 port. This will be our connection to test wether mysql has started or not.
The first payload:
CHANGE REPLICATION SOURCE TO
  SOURCE_HOST='$SOURCE_HOST_IP',
  SOURCE_PORT=3306,
  SOURCE_USER='$DB_REPLICATION_USER',
  SOURCE_PASSWORD='$DB_REPLICATION_PASSWORD',
  SOURCE_AUTO_POSITION=1;
Is to specify the parameters to where to connect in order for the master server to send data, and the key here is the SOURCE_AUTO_POSITION setting. Setting this option makes the source respond by sending all transactions recorded in its binary log whose GTID is not included in the GTID set sent by the replica (sauce).
After the replication has been done, we would have something like this:
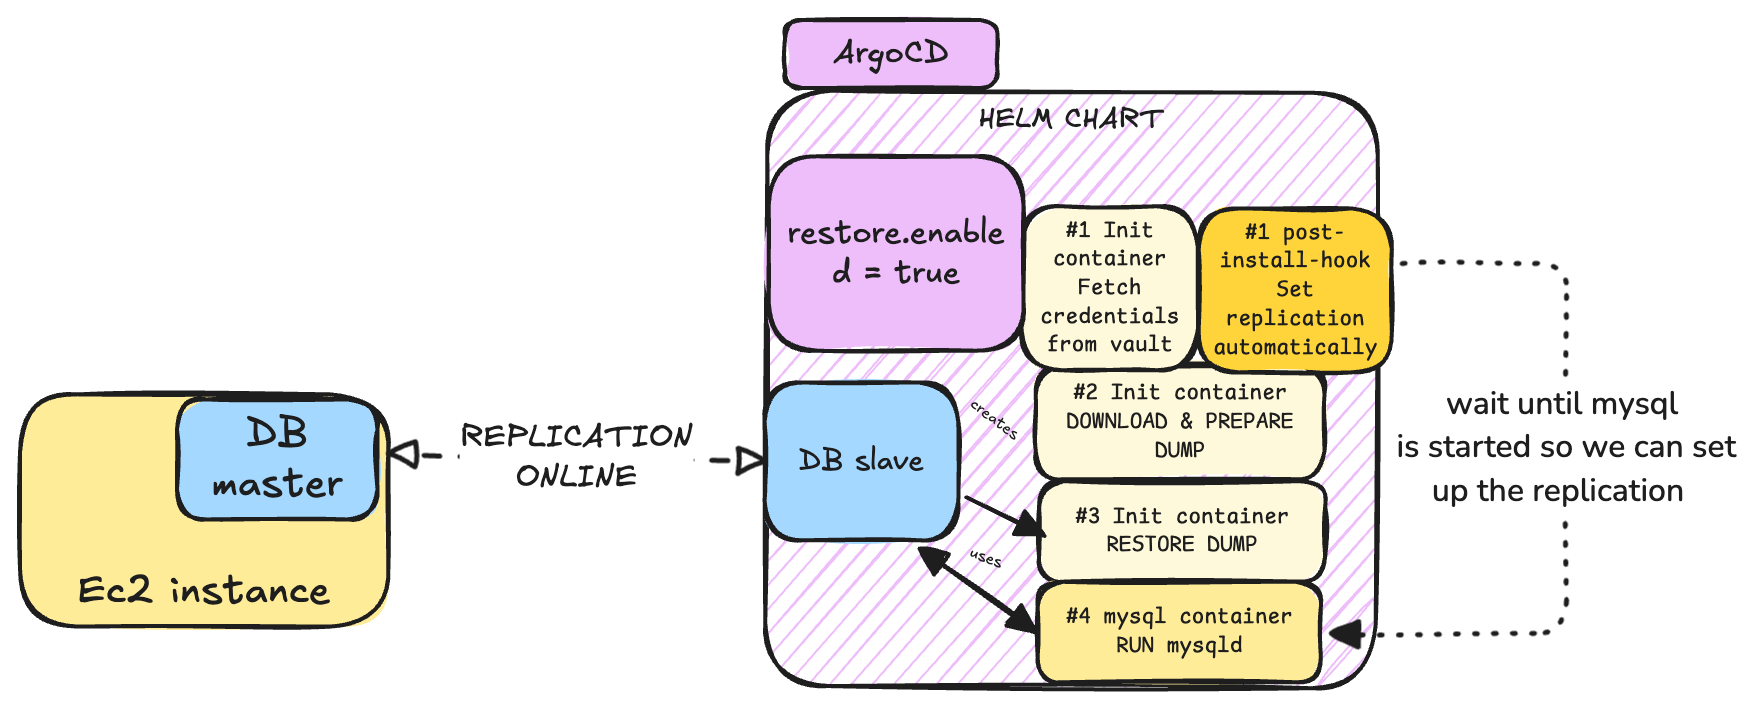
And of course, as we had in mind streamlining the whole process with Ansible, we can then add our own microservice (like an instance-manager) to control the lifecycle of the instances:
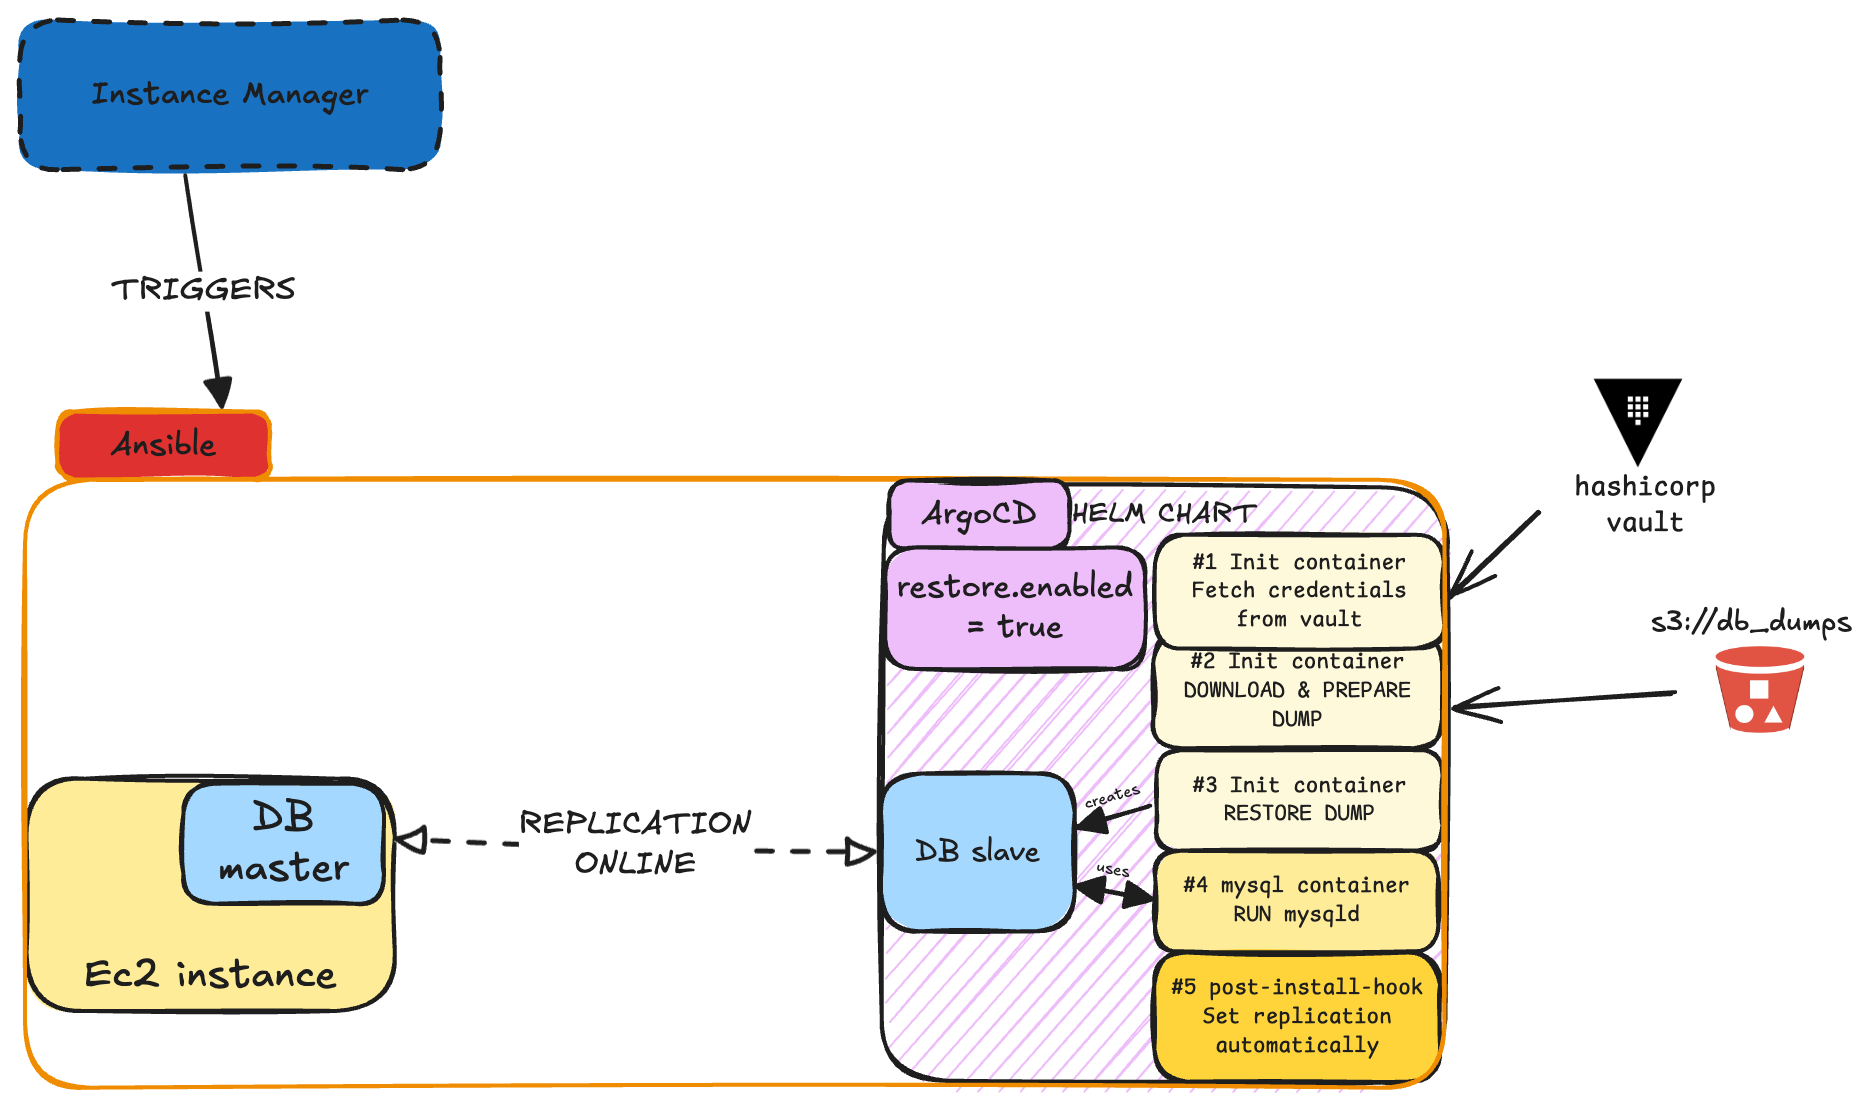
In some future steps, we can prepare some other automation to swap the master and the replica roles.
And that was yet another task in a day of an SRE/DevOps/OneManArmy. The learnings for today in a non-exhaustive list are:
- Now you should know how one way to set streaming replication for mysql
- What are GTIDs
- Almost everything can be automated
- Post-install helm hooks run always after installation, they are reckless and do not care about init processes
/dev/tcpmay be handy in containers without standard network tools- S3 buckets cross account replication
- How to authenticate in vault via HTTP
- Make a VPC peering connection
- IRSA is (IMHO) still better than EKS Pod Identity
Hope you have a great one! Remember to seek mental peace 🧘